Author Topic: Walkthrough  (Read 19109 times)

DarkSynopsis

  • Administrator
    • View Profile
    • Ninja's Fate
Re: Walkthrough
« Reply #15 on: February 17, 2016, 01:00:57 AM »
Yeah, Minimizing the editor is killer,  I do it often when I try build since I'm use to not watching it but with the Takedown Editor that is a No No since it always crashes.

How'd you manage the custom textures? running within the Retail Build? also did you put the texture in its own package and cook that along with the map? I know I tried it in the past and looking at some old emails I had an error along the lines of "Missing cached shader map" and if I brought the following files

GlobalShaderCache-PC-D3D-SM3.bin
GlobalShaderCache-PC-D3D-SM5.bin
GlobalShaderCache-PC-OpenGL.bin

RefShaderCache-PC-D3D-SM3.upk
RefShaderCache-PC-D3D-SM5.upk
RefShaderCache-PC-OpenGL.upk

Over from the Editor to Retail it would load the textures within the Retail build but you can't exactly go overwriting Cache files for each Custom Map, people would want multiple maps installed and bound to cause some conflict with base maps.

Imagine if custom textures are working custom meshes should also since it was a matter of a problem with building a custom package.

Slowly working on getting Tango Hunt working again, I did it sort of a hacky way in the past which would ristrict the map to Hunt mode only so looking into doing it the way the game does it by streaming in the entities depending on the mode.

Re: Walkthrough
« Reply #16 on: February 17, 2016, 02:10:21 AM »
LOL! Gold rule #1: "Never, ever, EVER minimize Takedown Editor"

No, I'm not replacing any textures or materials inside the Editor, I guess is time for me to contribute with a walkthrough:  :)

1. Inside Content Browser create a New Package: Clicking on the 'NEW' button at bottom-left corner of the Content Browser. I created it in: TakedownGame > Content. (Don't know if location has something to do).


2. Imported the image file for the texture into the newly created package. [ ABOUT IMPORTING THE FILE: Clic on the IMPORT button at the left-bottom corner of the Content Browser  and select the file from your HDD. [ ABOUT THE IMAGE FILE: Is a 1024x1024 .tga created with Adobe Photoshop: Save As > Type:Targa (*.TGA) ]

3.On the Import Dialog that opens up, make sure the Package name corresponds to the newly created Package and asign a Name to the Texture, also Grouping field adds like a Tag for organization (optional). The options below leave it like this (default) since this will be the texture for the diffuse map, and clic OK.


3.Once we have our texture imported inside the package, lets create the new material inside the same package too. Right Clic on an empty space > New Material. Again, check the Package name, add a Grouping tag, and a Name for the Material and clic OK.


4. The Material Editor opens up. Having the recently imported texture file selected on the Content Browser, go to the viewport section of the Material Editor and Hold T+Clic to create a "Texture Sample" element and join the black node of the 'Texture Sample' box to the 'Diffuse' node as seen on the image and clic the green Check Icon at the top left of the Material Editor and close the Material Editor.


5. In the Content Browser, Right-Clic on the created Package now containing a Material and a texture and clic on Save (In the image is seen as 'Guardar' since my OS is in spanish. (IMPORTANT)


6. From the Content Browser Clic and drag the new material to the desired BSPs.


7. Close Content Browser, Build All, Save, Cook, Copy&Paste, Run.


That should be it. Hope I got it clear and hope it works for you too! Please keep me posted how it went!  :) Didn't run on any of the errors you posted!
« Last Edit: February 17, 2016, 02:15:57 AM by carlosflorez87 »
CFFT

DarkSynopsis

  • Administrator
    • View Profile
    • Ninja's Fate
Re: Walkthrough
« Reply #17 on: February 17, 2016, 02:26:46 AM »


Lets get this Tango Hunt ball rolling...

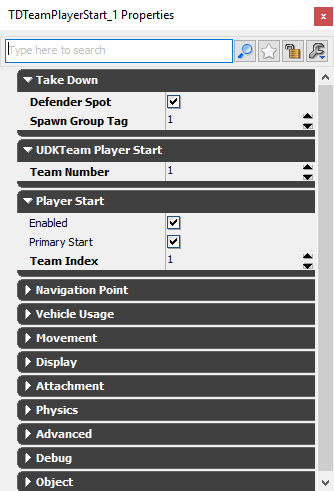
1. Add a "TDTeamPlayerStart", Double Click Entity for its settings.
2. Under "Take Down" you will want Defender Spot Ticked, Spawn Group Tag = 1.
3. Under "UDKTeam Player Start" you will need Team Number = 1.
4. Finally under "Player Start" you will want Team Index = 1.


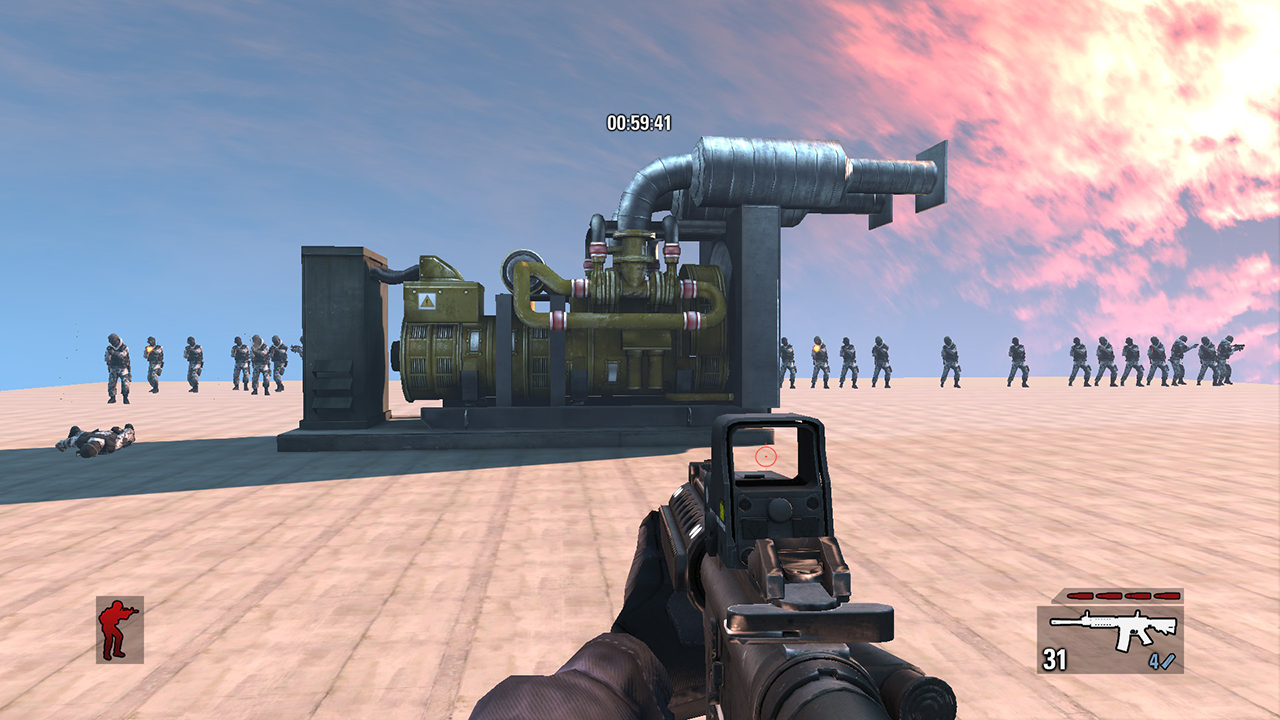
5. Now you will want at least 30 of these TDTeamPlayerStart's since that is the Max number of Tangos that will appear if playing High Density mode in Takedown, chances are you will want more then 30 so spawns are a bit more random.
6. Easiest way I've found is when you click on a TDTeamPlayerStart you can hold ALT and move with the gizmo in a direction, this will create a copy, saves re-doing settings each time.
7. Next up you want to add a "Pylon" entity, go into its settings and tick "Use Recast" this entity is the AIs NavMesh, you can hit "P" within the 3D Viewport to see what areas are covered, make sure to Build AI Paths to see if it doesn't cover enough of the map go back into the settings and change ramp up the Expansion Radius and Build Paths again.
8. The map would now work in Tango Hunt but it would limit the map to only Hunt due to the entities being used in other modes so now we need to take the "TDTeamPlayerStart" entities and put them in a separate .umap file that will only be loaded when Tango Hunt is the Game Mode.
9. Right Click on of the "TDTeamPlayerStart" entities and go Select -> Select All TDTeamPlayerStart Actors.
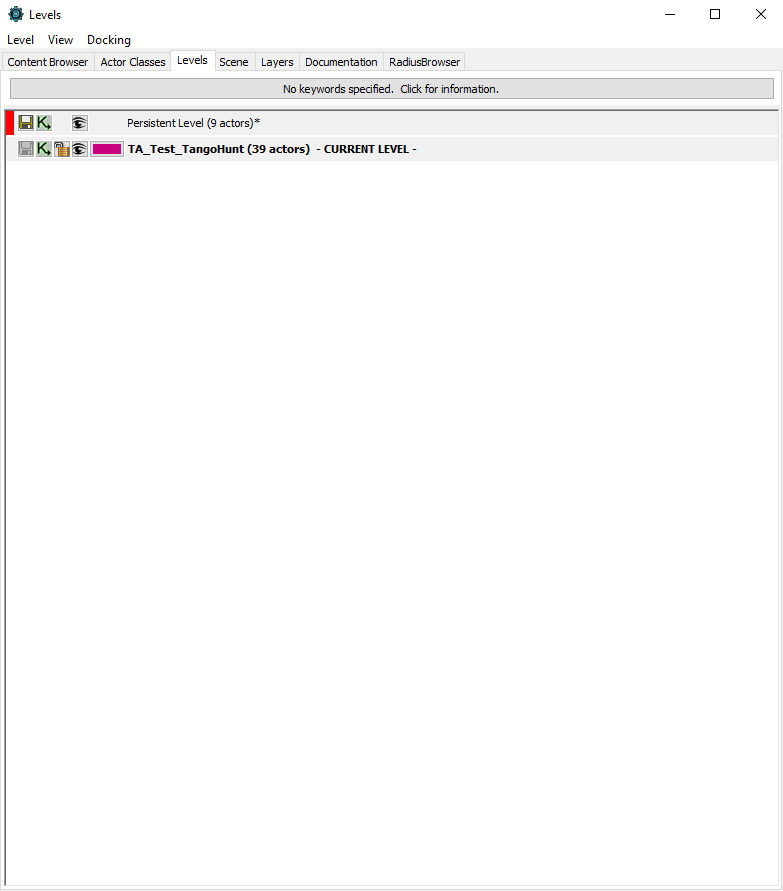
10. Go to View -> Browser Windows -> Levels.
11. Hit "Level" in the Top Left corner and hit "New Level from Selected Actors"
12. Save this as "MAPNAME_TangoHunt" to keep with the Takedown naming convention, don't have to so I'm going with "TA_Test_TangoHunt".
13. A prompt will come up asking to select a Streaming Method, we are going to go with Kismet.
14. You should now see Persistent Level and TangoHunt Level in the list, TangoHunt level won't kick in till we tell it to via Kismet, this is what lets us tell the game what entity map we want to use for what Game Mode.


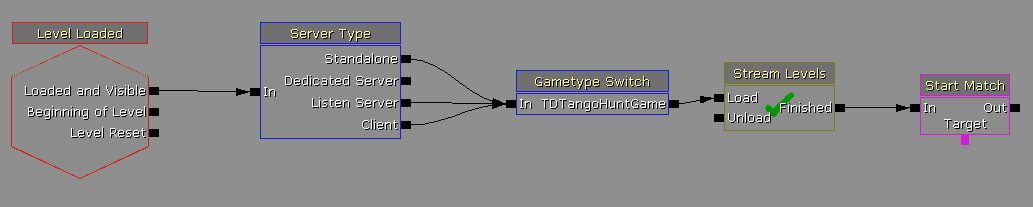
15. Open up Kismet and add "Server Type" node, New Condition -> Server Type.
16. We should already have a Level Loaded node so from the "Loaded and Visible" we want to connect to the In on the Server Type.
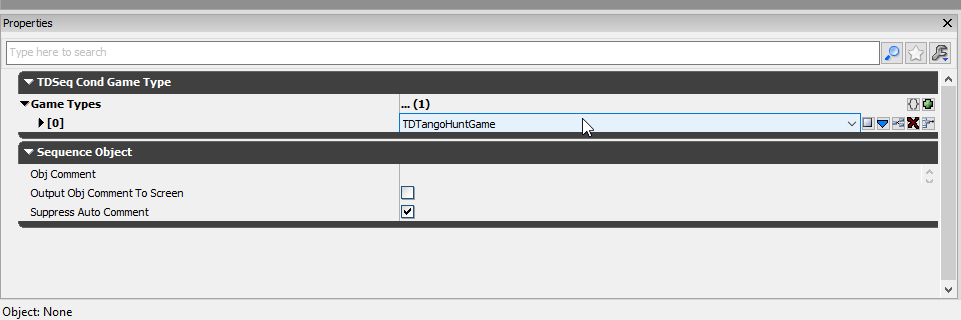
17. Next up we need a "Gametype Switch" node, New Condition -> Takedown -> Gametype Switch.
18. In the properties of the Gametype Switch we want to add "TDTangoHuntGame"


19. From Server Type each connection other then Dedicated Server should go into the Gametype Switch.
20. Now we need to add a Stream Levels node so we can bring in the Tango spawns, New Action -> Level -> Stream Levels.
21. In the properties of Stream Levels you want to add your TangoHunt file, in my case "TA_Test_TangoHunt" you will need to manually type the file name in but the Stream Levels node will get a tick if its correct.


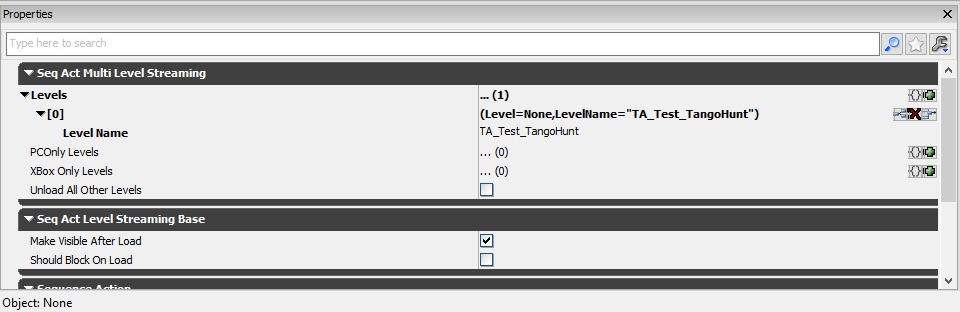
22. Connect the Gametype Switch to the Load on Stream Levels.
23. Finally connect Stream Levels up to a Start Match.


24. Now you will want to Build All/Save All Levels and cook the map plus the Hunt map so in this case I'll be cooking "TA_Test" and "TA_Test_TangoHunt" drag those both from "steamapps\common\Takedown Red Sabre Level Editor\TakedownGame\CookedPC\Maps" to "steamapps\common\Takedown Red Sabre Early Access\TakedownGame\CookedPC\Maps".
25. Now the map is all ready to go! but wait... a simple open console command won't do the trick this time so we are going to add it into the games menus.
26. Head to "steamapps\common\Takedown Red Sabre Early Access\TakedownGame\Config" and open up DefaultGame.ini
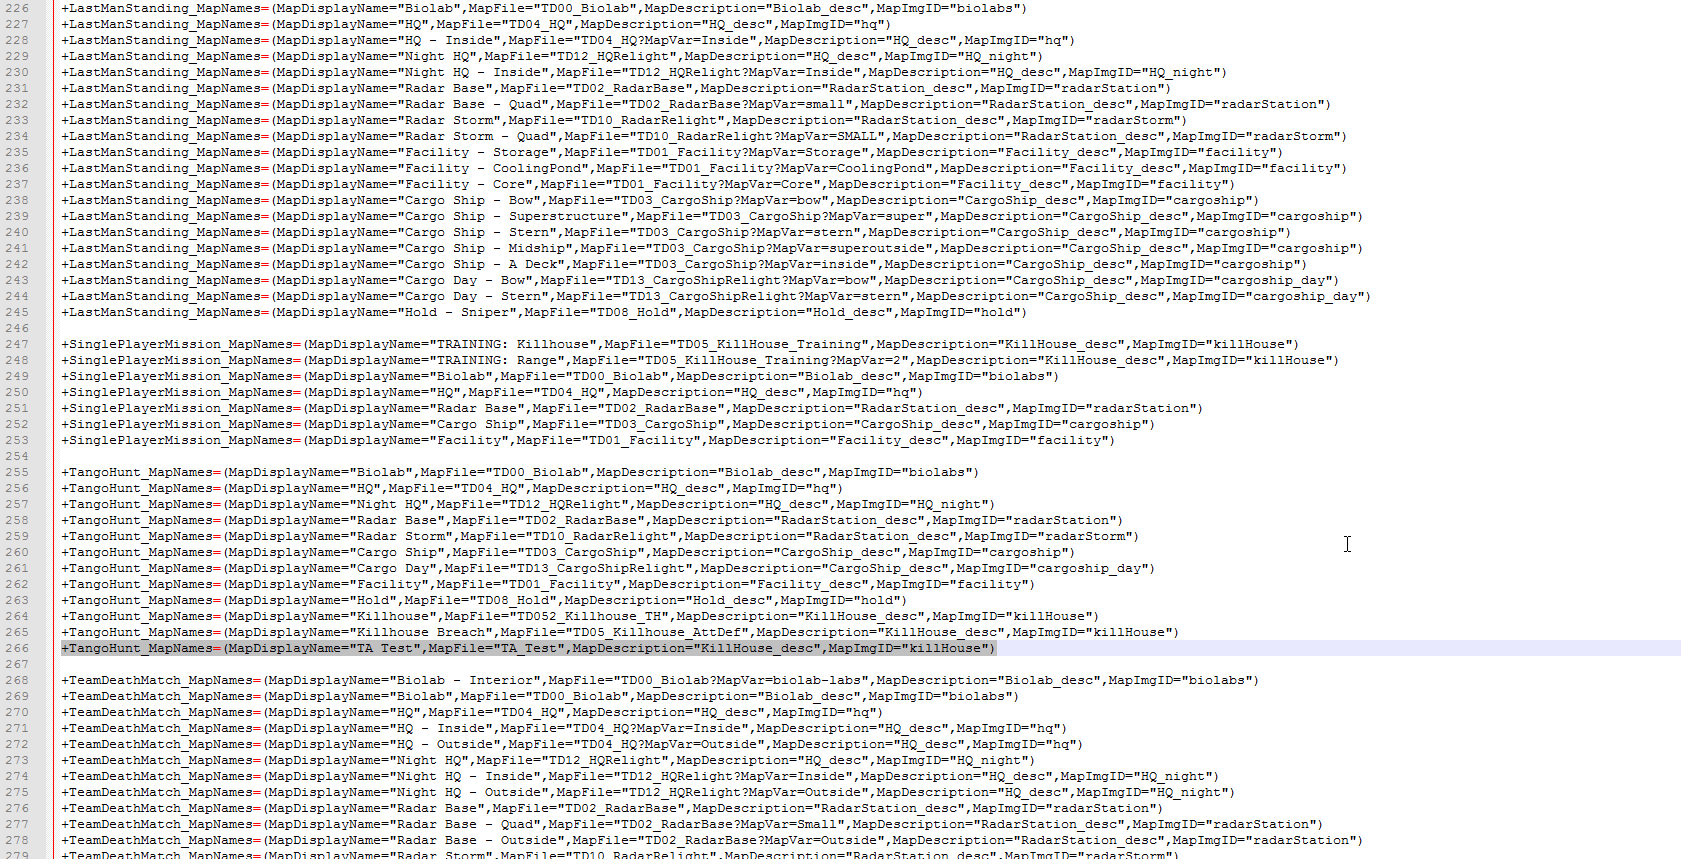
27. Find the line "+TangoHunt_MapNames=(MapDisplayName="Killhouse Breach",MapFile="TD05_Killhouse_AttDef",MapDescription="KillHouse_desc",MapImgID="killHouse")" should be around 265.
28. Now we want to add our map, under this line add something like "+TangoHunt_MapNames=(MapDisplayName="TA Test",MapFile="TA_Test",MapDescription="KillHouse_desc",MapImgID="killHouse")"
29. DisplayName is the what the game will use as the map name, MapFile points to the .umap.
30. The line can be added anywhere after [TakedownGame.TDPlayerController] but before [TakeDownGame.TDRoundBasedMPGame] is just like to keep it tidy.


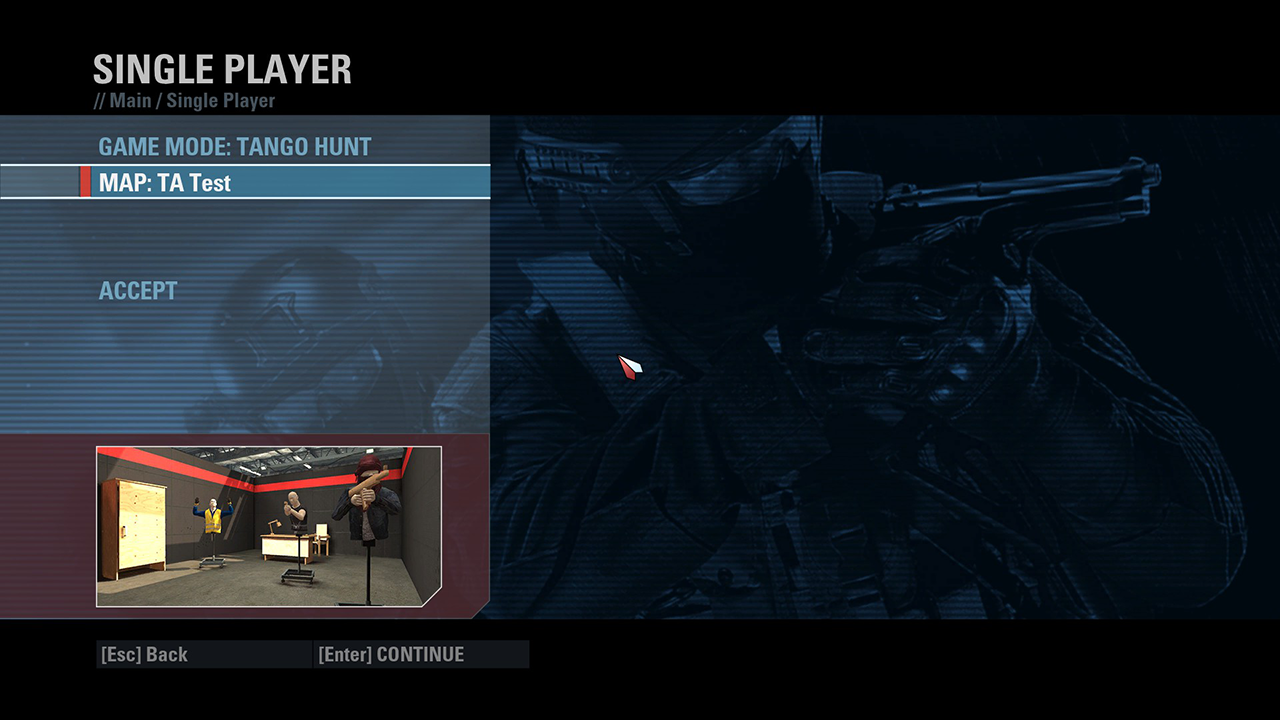
31. Boot up the game and select Tango Hunt as the Game Mode and you should see your map!


I'll have to do a quick post about our Mission Manager at some point all the program really does is add the Map to the DefaultGame.ini so people didn't have to manually go edit but for the time being you will want your own map in there anyway :)

Nice write up on the Custom Textures, was sure I had done all that so will have to test again, maybe later though! just took me a fair amount of time testing/writing up this Tango Hunt walkthrough, hopefully its easy enough to follow :)

DarkSynopsis

  • Administrator
    • View Profile
    • Ninja's Fate
Re: Walkthrough
« Reply #18 on: February 17, 2016, 02:43:18 AM »
Couldn't resist testing now, same problem I had in the past.


Game crashes while loading the level with the above problem, for the life of me I don't see what I'm doing wrong if its working on your end.

Re: Walkthrough
« Reply #19 on: February 17, 2016, 02:44:37 AM »
!!! WOW! Nice post back there!! Unfortunately I have to go to sleep now! it's 2:37 and I have to go to work tomorrow  in aprox. 5 1/2 hours (Damn being poor! :P) and haven't sleep all day, just modding!! :) So I'll give it a try tomorrow as soon as I get out of work.

I was going to bed, but then I was thinking about the custom meshes. Maybe you're having problem with packaging or something... I thought that if I was able to import a texture, I could import a Mesh....


VOILÁ!!!! :D :D :D :D I didn't do anything extraordinary or different of my previous post. Just exported a FBX file from 3DS Max, imported the same way as the texture was imported, to the same package also and that's it!!!! :) :) :) :)

Man I'm really excited right now!!! PLEASE tell me how it went!!! I don't think I'll be able to sleep, I want to keep working on this!! :) but gotta go! Please give it some runs and hope to get in contact in a few hours!
« Last Edit: February 17, 2016, 02:55:48 AM by carlosflorez87 »
CFFT

Re: Walkthrough
« Reply #20 on: February 17, 2016, 02:53:13 AM »
:( :( !! Oh damn! I've never seen an error like that.... But definitely it's on your end (at least we know that not everything is lost!)... I haven't done anything extraordinary but this:

1. "Go to: Steam\steamapps\common\Takedown Red Sabre Level Editor" and in the search field put "*.exe* and it should show all executable files inside the editor.

2.What I did was right-clic every file on that search result and go to: Properties > Compatibility > Execute this program as Administrator.


I was having a lot of trouble since the editor couldn't find some resources to properly work because didn't have permission to access other Files; I'm running on Win-7 64. Other than that, I haven't made any other major changes. Let me think a little bit tomorrow after having some rest if I remember something... But try this, maybe that can help.
« Last Edit: February 17, 2016, 02:57:19 AM by carlosflorez87 »
CFFT

DarkSynopsis

  • Administrator
    • View Profile
    • Ninja's Fate
Re: Walkthrough
« Reply #21 on: February 17, 2016, 03:21:34 AM »
I hear ya, hard to sleep when you get into something.

I'm super frustrated at this Custom Content thing now O.o it was one thing when I couldn't get it working back at the launch of the editor but to see its working for you is boggling my mind! I had talked to one of the devs back then who didn't have much luck getting it working either and seemed to just be the buggy editor.

Hell I'm using a different machine from back then so can't even narrow it to that!

Its awesome to see a Custom Mesh in there, first thing I tried after I got that error was admin privileges.

Going back through the Log file I noticed the following

[0013.36] Log: Missing cached shader map for material TALogo_Mat, quality 0, compiling.
[0033.42] Critical: appError called: ..\Win64\UE3ShaderCompileWorker.exe terminated unexpectedly! ThreadId=0
[0033.43] Critical: Windows GetLastError: The operation completed successfully. (0)
[0045.50] Critical: Error reentered: ..\Win64\UE3ShaderCompileWorker.exe terminated unexpectedly! ThreadId=2
[0045.50] Critical: Error reentered: ..\Win64\UE3ShaderCompileWorker.exe terminated unexpectedly! ThreadId=1
[0045.50] Log: === Critical error: ===
..\Win64\UE3ShaderCompileWorker.exe terminated unexpectedly! ThreadId=0

To me that looked like the game crashed due to trying to Cache the shader map using multiple cores so I headed to "Documents\My Games\UnrealEngine3\TakedownGame\Config" opened up the TakedownEngine.ini and changed "bAllowMultiThreadedShaderCompile=True" to False.

And...


Ok... I'm still some what amazed since it wasn't working at first O.o renamed the material and tried again and it did... huh... shall have to find a mesh...

DarkSynopsis

  • Administrator
    • View Profile
    • Ninja's Fate
Re: Walkthrough
« Reply #22 on: February 17, 2016, 03:40:24 AM »
Had to try a Mesh...


« Last Edit: February 17, 2016, 03:42:26 AM by DarkSynopsis »

DarkSynopsis

  • Administrator
    • View Profile
    • Ninja's Fate
Re: Walkthrough
« Reply #23 on: February 17, 2016, 04:13:18 AM »
Right, quick tutorial on TATDMM.

1. Head to "steamapps\common\Takedown Red Sabre Early Access\TakedownGame\Config"
2. Create a folder called "TAMissionManager"
3. Create a Text File that is the same as the .umap, in my case "TA_Test.txt"
4. In this file you just want to add the line you added to the DefaultGame.ini when setting up Tango Hunt.
5. "+TangoHunt_MapNames=(MapDisplayName="TA Test",MapFile="TA_Test",MapDescription="KillHouse_desc",MapImgID="killHouse")"


6. Now when you boot up TATDMM you can click "TA_Test" and it will add the line to the DefaultGame.ini.


7. Boot up the game and enjoy.

Program was made so users didn't have to fiddle with editing .ini files all the time, so when you pack up a map you would include the .txt file, at least we was going to make it a standard for any maps we hosted here on the site.

Damn... not sure I even have the code for TATDMM O.o think its my HDD that failed :( hopefully shouldn't need any real improvements at this point, though it does show "TA_Test_TangoHunt" since I never thought about excluding it showing each game mode, would be tough to do anyway if creators don't follow the standard Takedown uses, ah well won't cause an issue.

Now I really should get some sleep, maybe tomorrow I'll boot up a second machine and see how Multiplayer goes, in the past just having a custom map in the folder seemed to break Multiplayer for any level let alone the custom map not working, another reason we never really got anything out.

No one wants to install a custom map, forget they did so and can't play Multiplayer.

Re: Walkthrough
« Reply #24 on: February 17, 2016, 09:03:03 AM »
:) Man, I'm just glad you got things working now!  It was a shame that things didn't work out before, maybe back then, the modding for TAKEDOWN would have seen it's days... But well actually it would be a bigger shame if the problem remained unsolved! I'm at work now, I'll be checking the Tango Hunt tutorial on afternoon and keep working on my level! :)
CFFT

DarkSynopsis

  • Administrator
    • View Profile
    • Ninja's Fate
Re: Walkthrough
« Reply #25 on: February 17, 2016, 02:09:07 PM »
Booted up a second machine, also had to do the whole change "bAllowMultiThreadedShaderCompile" to False so unless you are running a single core I'm baffled why you didn't have to toy with anything.

Onto Multiplayer, the map didn't work, comes up with a failed to download package error which is odd since its trying to get a base game package that I haven't touched, unless I can find an ini tweak that would let it join without trying to download we might be out of luck :(


On the + side as long as the Lobby isn't set to the Custom Map I can join it, so Multiplayer isn't completely broken.
« Last Edit: February 17, 2016, 02:19:25 PM by DarkSynopsis »

DarkSynopsis

  • Administrator
    • View Profile
    • Ninja's Fate
Re: Walkthrough
« Reply #26 on: February 17, 2016, 03:17:13 PM »
Found "AllowDownloads=True" and set it to False which resulted in the following.


I had started to come to the conclusion the way we are cooking the map is wrong, the custom models/textures are being packed into the .umap file it seems where as they should be a in a separate .upk that we also bring over from Editor to Retail which could have been what was leading to the game trying to "redownload" a package the game should already have, we might be repacking the assets from Takedown into our .umap.

I've slowly started to believe that is not the problem though since even with removing any Takedown Material/Model and just leaving in my custom ones it stills give me a failed to download message so its not the original TD Assets conflicting with the ones inside the .umap assuming they are being packed in.

I think we might need a new cooking process? unsure or a hacky way in which we disable the client/server trying to see if files match up, no idea if Unreal Engine 3 has the ability to disable something like that or where to find it.

My files aren't mismatching anyway so don't see why its causing hassle.

Most I can find is an Unreal Engine 4 Console Command "net.IgnorePackageMismatch=1" unfortunately I'm not finding anything similar for UE3/UDK :(
« Last Edit: February 17, 2016, 03:27:03 PM by DarkSynopsis »

DarkSynopsis

  • Administrator
    • View Profile
    • Ninja's Fate
Re: Walkthrough
« Reply #27 on: February 17, 2016, 08:37:58 PM »
After countless hours of changing various lines in .ini files to trying some console commands I thought to myself, I haven't tried any command lines that execute when the game starts, messed with a few of those and ended up using "-SEEKFREEPACKAGEMAP"

I GIVE YOU MULTIPLAYER!


1. Right Click Takedown in Steam and hit Properties
2. Click Set Launch Options.
3. Add "-SEEKFREEPACKAGEMAP"


4. Hit OK.
5. Multiplayer should now work on custom maps ;)

I should most likely have tested to make sure default maps still worked... imagine they do and the command line is easy enough to remove anyway.

:'( :'( :'( its beautiful...

I'm sure none of what I'm doing is the correct way but I won't argue if it works :)
« Last Edit: February 17, 2016, 08:40:45 PM by DarkSynopsis »

Re: Walkthrough
« Reply #28 on: February 17, 2016, 09:54:13 PM »
 :o :o :o :o  ;D ;D ;D ;D  :D :D :D :D Man! This is just too much!!! I'm glad that what started as an exploration excercise just evolved in the best  and most complete guide on the web about TAKEDOWN Modding :) You're the boss  8) I really think we should wrap this up in a nice PDF and pass the voice over to 505 Games maybe, to show them what TacticalApe has achieved.

I haven't had much time this day  :'( been busy at work and some other errands, but hell, the night is still young and I have to test EVERYTHING on this post! as soon as I have a decent scenario to try them on!


Thanks again for sharing all your knowledge with the best vibe all time (Y)
CFFT

Re: Walkthrough
« Reply #29 on: February 18, 2016, 02:09:17 AM »
I've just finished blocking out my level, everything was done in 3DS Max, and imported into Level Editor, no BSP used, I wanted  to try the workflow between both programs (I'm getting used to Level Editor, just crashed a couple of times, but I can actually enter and exit play mode in viewport without crashing).  I wanted so bad to try Tango Hunt mode!!! this is how it went:


Everything went fine as usual! That Tango Hunt tutorial rocks! super easy to follow :) :) :) :) I just can't stop thanking you! A week ago I was so much interested on creating maps for this great game but didn't know where to start.... Now I can create any map I want, and play it on Tango Hunt (wich happends to be my favorite gametype) and on top of all, you just solved the Multiplayer mysterious issue!! :D :D :D Congratulations man, really! My total respects! you're a pro modder! do you work at videogame industry??

I'm also adding links to both files of my map :) If you want to try them!

https://dl.dropboxusercontent.com/u/28069679/Tactical%20Ape/TD06_mission.umap
https://dl.dropboxusercontent.com/u/28069679/Tactical%20Ape/TD06_mission_TangoHunt.umap

I'm just glad to have found this forum, TacticalApe f*cking Rocks!!!!! :D :D :D

I'll be posting more screenshots and as usually a lot of questions and a couple of walkthrough requests! :)


« Last Edit: February 18, 2016, 02:32:21 AM by carlosflorez87 »
CFFT


anything