SWAT 3 is an old game now but learning to make levels for it is a great way to cut your teeth in level editing. The tool used to do it is known as Worldcraft 3.3. This has now evolved into Hammer and is still used in Valve software such as Counterstrike, Half-life and their sequels.
Step 1 - Installing or locating the EditorIf you have already installed your SWAT 3 game then look in your c:\Sierra\SWAT3\Tools\Worldcraft folder to find the editor (WC.exe). If you still cannot find it head over to our downland section and look under tools. Once you have it and a nice clean installed version of SWAT 3 you are ready to go ahead and install Worldcraft to the directory mentioned. (This assumes that you installed your game to the C: drive if not go ahead and replace all mentions of the C: drive with the letter of the drive you did install it to.) Click on install and follow the onscreen prompts making sure to set the install location to your SWAT 3 Tools directory. Once this is done it is on to configuring Worldcraft to work with and understand SWAT 3.
N.B. If you are totally new to this and have purchased your copy from GOG then you should be looking in Program Files (x86)\GOG.com\SWAT 3\game\Tools for your Worldcraft folder and should treat this as your home directory for Worldcraft.
Step 2 - Configuring The Editor for SWAT 3Once Worldcraft launches you should be presented with a configuration screen, if not you can bring it up by selecting Tools from the menu bar then the Options from the drop down menu. Make sure you then select the Game Configurations tab.

This image shows the directory structure you need for an install from the new GOG release. Typically for the original release you would replace the
\Program Files (x86)\GOG.com\ with
\Sierra\Game Configuration Tab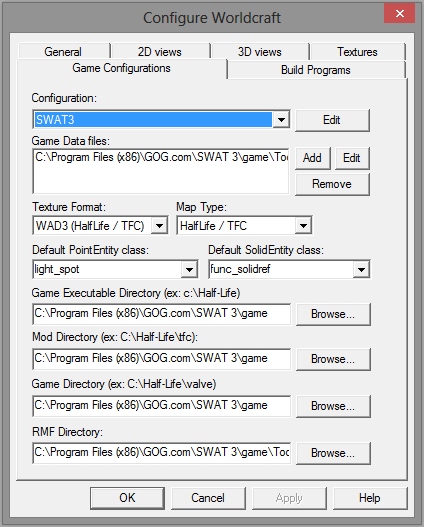
So under configuration you will only be able to select SWAT3 from the drop down (this is a good thing).
Game Data Files: This should point to the swat.fgd file in your Worldcraft directory.
Texture Format: This should be set to WAD3 (Half Life / TFC).
Map Type: This should be set to Half Life / TFC.
Default PointEntity Class: This is typically set to light_spot.
Default SolidEntity Class: This is typically set to func_solidref.
The next three entries where you can browse for a directory should all be set to your main SWAT 3 game directory, and the fourth and last (RMF Directory:) should point to your Tools\Worldcraft\sample\mission\ folder.
It is the last step that lets you open up the sample map and have a look around. This is also where you will be saving your .RMF's (the file format for SWAT 3 levels).
Build Program Tab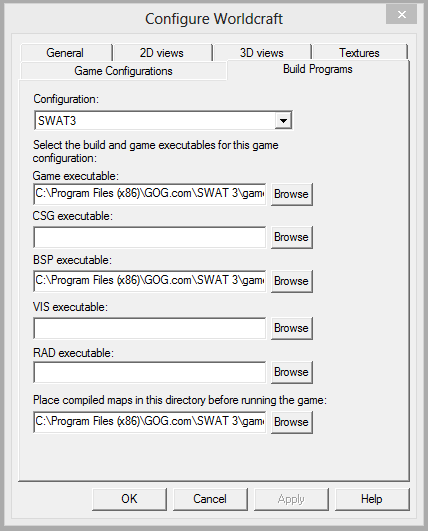
Configuration: Should be set to SWAT 3 and again should be your only choice in this drop down menu.
Game Executable: This should be set to your swat3.exe in the game folder.
BSP executable: This should be set to your map.exe in the Worldcraft folder.
Place Complied Maps: This should be set to your Worldcraft\sample\missions folder.
Textures Tab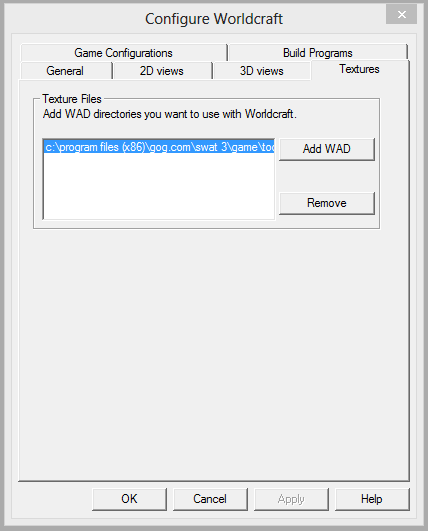
This is where you add WAD files. These are how SWAT 3 deals with its level textures. For now point this to your Worldcraft/Sample/missions folder. When you start making textures of your own you will need to learn more about the .WAD format and what can and cannot be done, but remember this is the area you will be adding the .WAD Files.
Once this is all done you can click okay and you will be left in a blank Worldcraft scene. From here you can create your own new level or load up the sample map. Click File on the tool bar to do either (I suggest taking a look around the sample mission first).
N.B The option available on the other tabs are mainly optional and for a beginner should be left as is.
 Topic: How To Make Levels For SWAT 3: 01 - Installing & Configuring (Read 11370 times)