Show Posts

This section allows you to view all posts made by this member. Note that you can only see posts made in areas you currently have access to.


Topics - CraftyReaper

Pages: 1 [2] 3
16


From Left to Right

Toggle Grid - Toggles the grid on / off.
Toggle 3D Grid - Toggles the camera view grid on / off.
Increase Grid - Increases the grid lines.
Decrease Grid - Decreases the grid lines.
Load Window State - Loads a preserved window state.
Save Window State - Save the current layout of your windows.

17


From Top to Bottom

Selection Tool - Used for selecting objects (brushes / entities) in all view-ports
Magnify Tool - Used to magnify objects. A mouse scroll-wheel replace this as functional.
Camera Tool - Used to rotate camera in 3D View-port (camera)
Entity Tool - Used to create Entities.
Block Tool - Used to create geometric shapes, also known as brushes.
Texture Application Tool - Used to apply textures to brushes.
Apply Current Texture Tool - Used to apply the currently selected texture to brushes.
Decal Tool - Used to apply decals to surfaces.
Clipping Tool - Used to reshape brushes.
Vertex Tool - Used to manipulate vertex on brushes to redefine the shape.
Path Tool - Used to create paths for AI.
Clipping Tool - 
Vertex Tool -
Path Tool -

18
So now you have the basics of moving in the view-ports we can discuss the rest of the editors interface, starting with the menu bar.

This consists of the File, Edit, Map, View, Tools, Window,and Help menus.

File Menu - this hold the commands typical to all window applications and you should be more than familiar with the concepts of opening, closing, creating and saving files. The other option are to do with exporting to other formats and the Run command. we will not be covering exporting in this tutorial and the Run is used to test your 'compiled' map in the game, which will be discussed at a later stage.

Edit Menu - This again is consistent with window apps. Here you can cut, copy and paste along with undoing and redoing your work. you can also clear a selection and select all. The interesting command in here is the Properties command. Once you have selected an object (go ahead and select a chair in the camera view (Arrow Tool + LMB))  you can then press Alt-Enter or select Properties from the Edit Menu to bring up the individual properties for that object. (more on this as it is used)

Map Menu
Snap To Grid - When creating geometry this allows you to maintain precise sizing by snapping to the grid (more later) (Shift-W)
Show Grid - Turns Grid on/off. (Shift-R)
Grid Settings - Increase/Decrease Grid size.

Go To Brush Number - Allows to to enter a brush or entity number to jump to. (Ctrl-Shift-G)
Show Information - This displays the overall stats for your level. (Faces used, WAD's used and Memory size, etc).
Entity Report - List your Entities and allows you to jump  to them.
Check For Problems - Scan your map and identifies trouble areas. (Alt-P)

Map Properties - Displays the Object properties for the overall scene.

Load Pointfile - Loads a Pointfile.
Unload Pointfile - Unloads a Pointfile.

View Menu
Screen Elements - This allows you to turn toolbars on and off

2D X/Y - Let you change the orientation that you see through your view ports (normally left alone).
2D Y/Z - Let you change the orientation that you see through your view ports (normally left alone).
2D X/Z - Let you change the orientation that you see through your view ports (normally left alone).

3D Wireframe - Shows Wireframes in your 3D view-port.
3D Filled Polygons - Shows a Filled (Flat) Polygon view in your 3D view-port.
3D Textured - Shows a textured view in your 3D view-port.

Autosize 4 Views - Resets the view-ports to equal proportions. (Ctrl-A)
Center Views On Selection - This is an essential Hotkey combo to learn if you want to save time in your navigation Ctrl-E will take all four views to the object you have selected, then you can zoom in straight to the highlighted object.

Show Connections - These are used in AI Path making (more later).
Hide Items - These are used in AI Path making (more later).
hide Paths - These are used in AI Path making (more later).

Hide selected Objects - Hide objects to reduce clutter from the scene whilst working on specific areas.
Show Selected Objects - Bring back hidden Objects

Tools Menu
Carve - A tool for subtracting geometry. (Shift-Ctrl-C)
Make Hollow - Another tool for subtracting geometry. (Ctrl-H)

Group - Grouping objects together. (Ctrl-G)
Ungroup - Ungrouping objects. (Ctrl-U)

Tie To Entity - Tie an Object to an Entity. (Ctrl-T)
Move To World - (Ctrl-W)

Texture Application - Applies texture to geometry. (Shift-A)
Replace Textures - Replaces selected texture/s.
Texture Lock - Locks a textures in position. (Shift-L)

Snap Selected To Grid - Snaps a selected object to the grid. (Ctrl-B)
Transform - ... (Ctrl-M)
Align Objects - Alignment tools (left, right, top, bottom).
Flip Objects -  Flip Objects horizontally or vertically.

Prefab Factory - Brings up the Prefab Factory so you can select and use prefabs.
Create Prefab - If you make an object in Worldcraft that you will wish to repeat you can turn it into a prefab by selecting it and hitting Create Prefab. making it useable throughout the level.(Ctrl-R)

Options - Brings up The Configuration panel.

19
At this stage we assume you have gotten Worldcraft installed and configured correctly, and are set to learn about the editor.

Load up the Sample Level

In the editor click File and then Open, navigate to your Worldcraft/sample/mission folder and select the sample.rmf and click open.
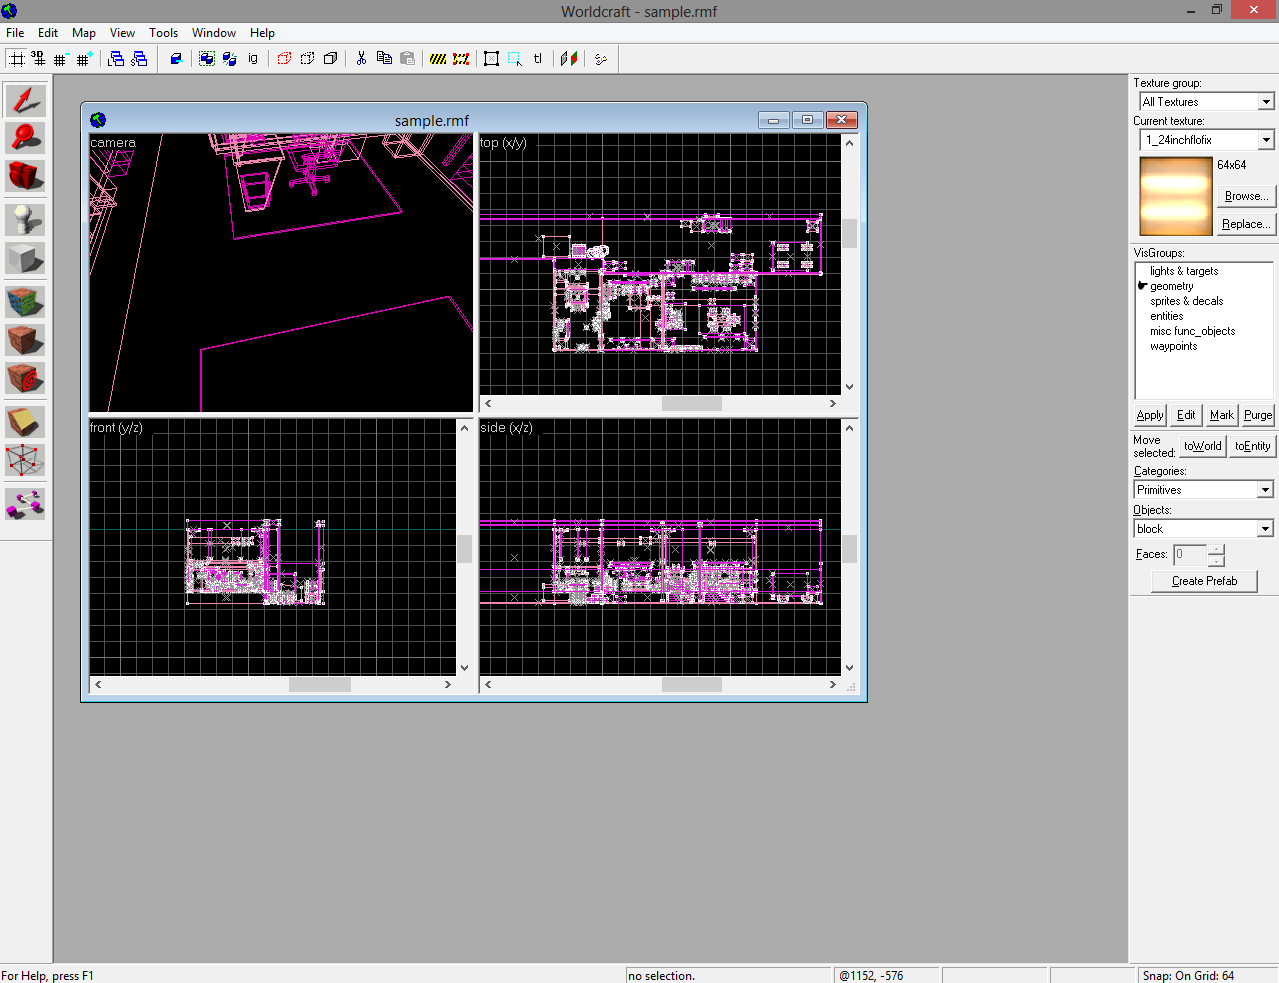


You should be presented by something similar to this image above. What you are looking at is a toolkit that will help you build the level you want through the use of view-port navigation. In the center you see four view-ports named camera, top, side, front, and in these viewports you see lots of pink/purple lines that represent the wireframe that makes up the levels geometry. If your view is like mine you will want to go ahead and maximize the view-port window (the more screen space you have to work with is in general a better way to work).
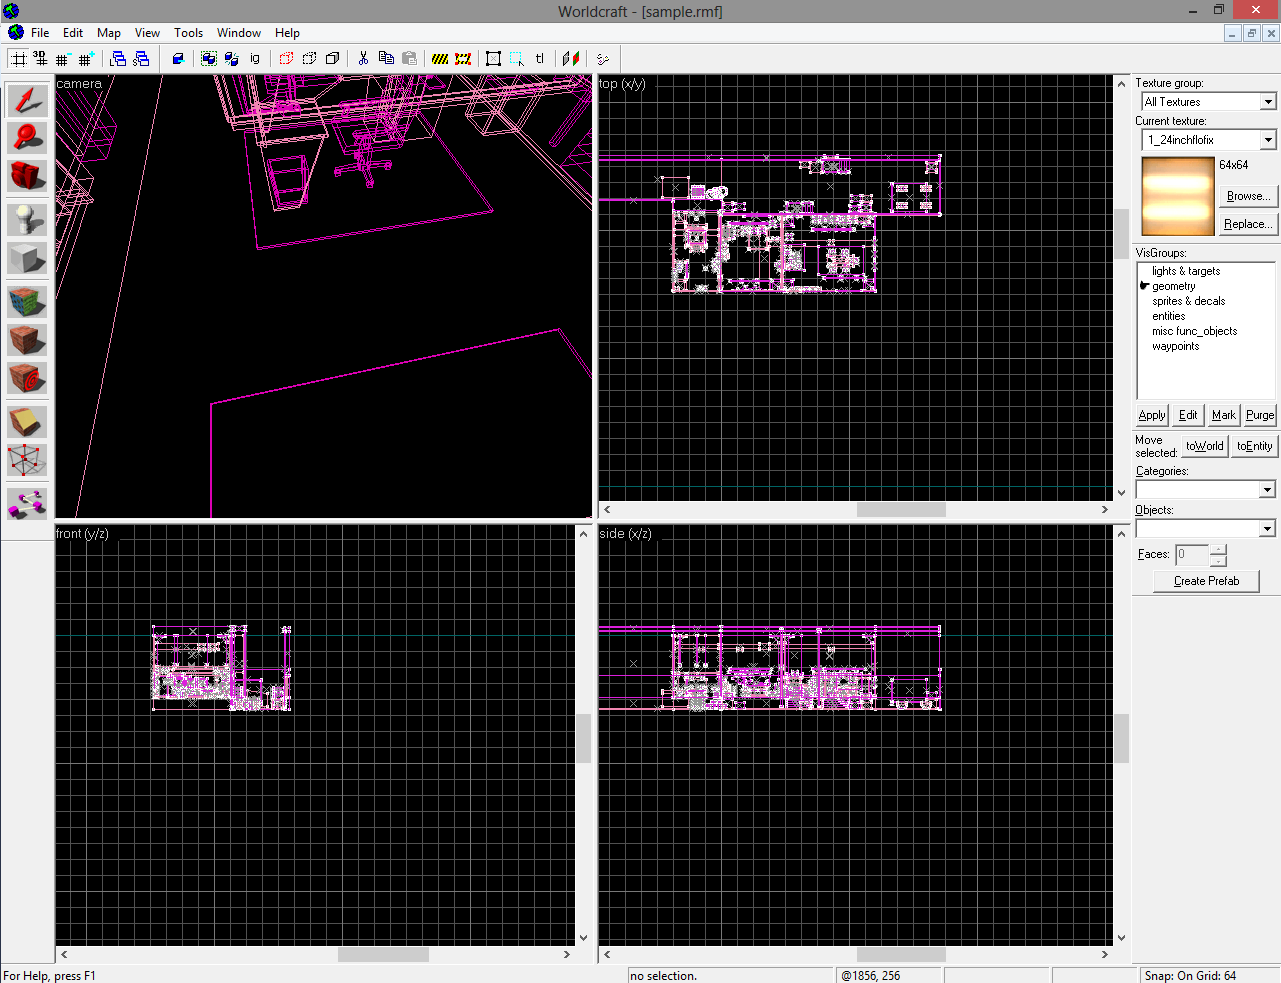


This is what you will see most of the time you are in the editor. So now we will deal with how to move around in the view-ports before covering the various button and knobs.

Orthographic View-ports

Lets start with the 3 views other than the camera. These are what are called Orthographic views and they represent a flat view from the top of an object/scene or from the front of the object/scene or the side of an object/scene.

To move about in these view-ports you need to place your mouse over the view you want to move and hold down the space-bar. This will bring up a hand icon and you can now drag you scene around to the position you want to concentrate on. Once you find an area you want to work with you can zoom in/out of it by using your mouse scroll-wheel (with or without the space-bar held).  If you do not have a mouse with a scroll-wheel you can use the keys 'd' to zoom in and 'c' to zoom out instead.

If you have a scene that contains some geometry you can use your left mouse button (LMB) to select the various objects that make up that scene (level).

Using the right mouse button (RMB) bring ups a menu relating to the objects you have selected.

There are also scroll bars on the sides of these windows to help you get around the level quicker if needed, just hold and drag.

Lastly for the Orthographic views you can LMB or RMB on the view-port name (Top, Front, Side) to access more options. These allow you to change the view-port to a different view if you prefer a different layout (for example 3DS max users have there camera(perspective) in the bottom right). You can also change the type of shading (wire-frame, flat, textured) this will be essential as you move through your editing.

Perspective View-port

The Camera view-port is known as a perspective view. This simply means that we can move in and out of the 3D space like we do in real life. By utilizing the w,a,s,d, keys we can control the camera much like we do a 3D game character. however at this point we cannot rotate the view which is needed for full navigation. We do this by selecting the Camera icon in the toolbar on the left or by pressing 'z' on the keyboard. Now when we LMB in the camera view-port our cursor becomes a cross and we can rotate the view by dragging our cross-hair around. Note if you use the keyboard method you must press 'z' again to release the cross-hair where as with the camera icon method releasing LMB release the cross-hair. I should also point out that it is possible to use the RMB but this gives a different result and acts similar to panning in a 2D (Orthographic) view. To move in and out of your view you simply walk forward or backwards like you would in a game, or you can use a scroll-wheel if you have one.

You can LMB or RMB on the view-port name (camera) for the same options as in the 2D view-ports.

When you have finished moving and wish to select an item in the camera view you will need to select the Arrow icon on the left to enable selection then use you LMB to pick an object.

Grids

You have all this time seen light grey lines running vertically and horizontally across the three orthographic view-ports. These are called Grid lines and will help us later to size our objects. You can increase and decrease the amount of grids lines (and therefore their spacing) be using the keys '[' and ']'. You can also enable Grids in your camera view by pressing 'p' and again this can be resized in the same way.

Now before I go on I am going to change my camera view to a textured view (read back if you have forgotten how).
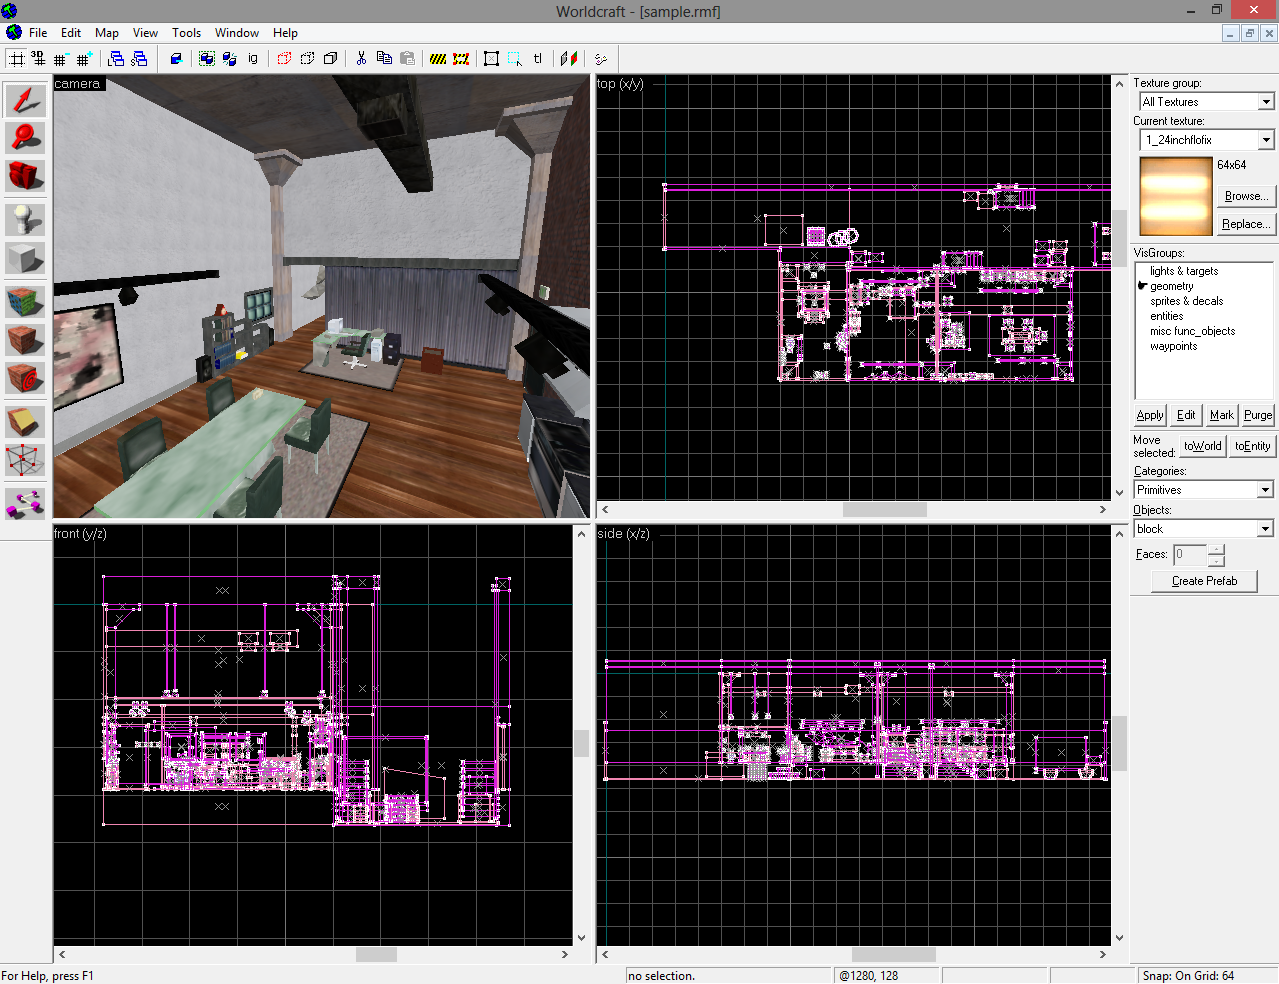


Now the last thing to say is that the view-port windows can be resized to your liking by hovering your mouse over where they meet until your icon changes to a cross with arrows on it and dragging with your LMB pressed. Or by hovering over where two view-port windows meet and doing the same.

20
SWAT 3 is an old game now but learning to make levels for it is a great way to cut your teeth in level editing. The tool used to do it is known as Worldcraft 3.3. This has now evolved into Hammer and is still used in Valve software such as Counterstrike, Half-life and their sequels.

Step 1 - Installing or locating the Editor

If you have already installed your SWAT 3 game then look in your c:\Sierra\SWAT3\Tools\Worldcraft folder to find the editor (WC.exe). If you still cannot find it head over to our downland section and look under tools. Once you have it and a nice clean installed version of SWAT 3 you are ready to go ahead and install Worldcraft to the directory mentioned. (This assumes that you installed your game to the C: drive if not go ahead and replace all mentions of the C: drive with the letter of the drive you did install it to.) Click on install and follow the onscreen prompts making sure to set the install location to your SWAT 3 Tools directory. Once this is done it is on to configuring Worldcraft to work with and understand SWAT 3.

N.B. If you are totally new to this and have purchased your copy from GOG then you should be looking in Program Files (x86)\GOG.com\SWAT 3\game\Tools for your Worldcraft folder and should treat this as your home directory for Worldcraft.


Step 2 - Configuring The Editor for SWAT 3

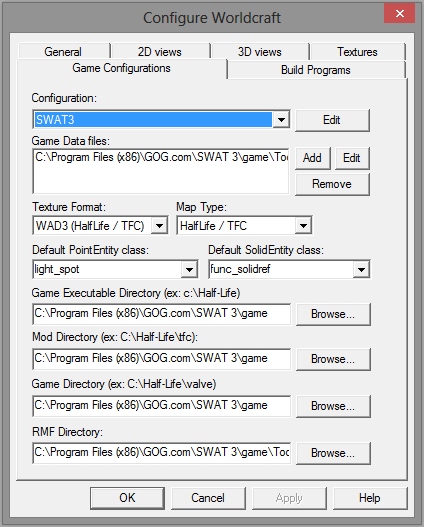
Once Worldcraft launches you should be presented with a configuration screen, if not you can bring it up by selecting Tools from the menu bar then the Options from the drop down menu. Make sure you then select the Game Configurations tab.


This image shows the directory structure you need for an install from the new GOG release. Typically for the original release you would replace the \Program Files (x86)\GOG.com\ with \Sierra\

Game Configuration Tab


So under configuration you will only be able to select SWAT3 from the drop down (this is a good thing).
Game Data Files: This should point to the swat.fgd file in your Worldcraft directory.
Texture Format: This should be set to WAD3 (Half Life / TFC).
Map Type: This should be set to Half Life / TFC.
Default PointEntity Class: This is typically set to light_spot.
Default SolidEntity Class: This is typically set to func_solidref.

The next three entries where you can browse for a directory should all be set to your main SWAT 3 game directory, and the fourth and last (RMF Directory:) should point to your Tools\Worldcraft\sample\mission\ folder.

It is the last step that lets you open up the sample map and have a look around. This is also where you will be saving your .RMF's (the file format for SWAT 3 levels).

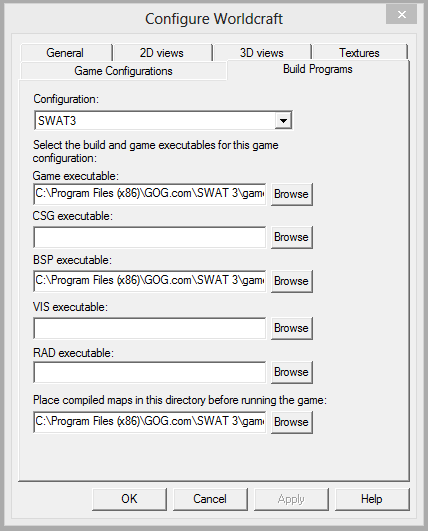
Build Program Tab


Configuration: Should be set to SWAT 3 and again should be your only choice in this drop down menu.
Game Executable: This should be set to your swat3.exe in the game folder.
BSP executable: This should be set to your map.exe in the Worldcraft folder.
Place Complied Maps: This should be set to your Worldcraft\sample\missions folder.

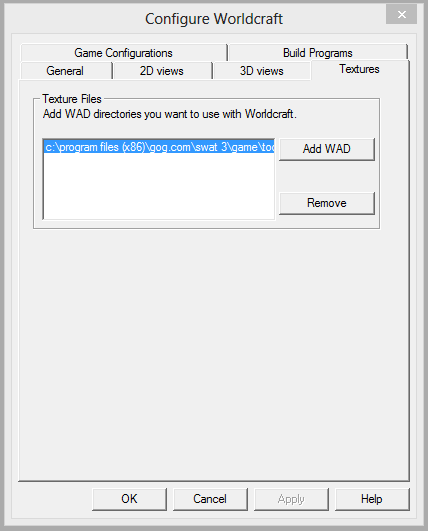
Textures Tab


This is where you add WAD files. These are how SWAT 3 deals with its level textures. For now point this to your Worldcraft/Sample/missions folder. When you start making textures of your own you will need to learn more about the .WAD format and what can and cannot be done, but remember this is the area you will be adding the .WAD Files.

Once this is all done you can click okay and you will be left in a blank Worldcraft scene. From here you can create your own new level or load up the sample map. Click File on the tool bar to do either (I suggest taking a look around the sample mission first).

N.B The option available on the other tabs are mainly optional and for a beginner should be left as is.

21
SWAT 4 General Discussion / Section Added To Tactical Ape
« on: February 13, 2014, 04:18:36 PM »
We have added a section covering SWAT 4 on the main website and will shortly be adding more downloads for the game, in the form of missions and mods. This will happen as we test them, with the objective of being as comprehensive as possible.

22
Rainbow Six Raven Shield Modding / Mapping / Console Commands
« on: February 08, 2014, 01:22:10 PM »
Here are a few of the console commands in RavenShield they may help mappers/modders.

maplist : List map names and ID.
brightness : Adjust brightness
contrast : Adjust contrast
gamma : adjust gamma
shot : Takes a screenshot (saved to the RvS directory)
BehindView 1 - Allows you to play in third person (0 is first person)
Ghost - Allows you to fly around the map (typing Walk will end it)
NeutralizeTerro - Neutralizes all terrorists in the level
RendSpot - Allows you to see where all terrorists have spawned on the map
Route - Shows where terrorists and hostages have moved through out the map
RouteAll - Shows all routes that Terrorists and Hostages take

23
Rainbow Six Raven Shield General Discussion / Section Added To Tactical Ape
« on: February 08, 2014, 01:15:42 PM »
We have added a section covering Tom Clancy's Rainbow Six 3 RavenShield on the main website and will shortly be adding more downloads for the game, in the form of missions and mods. This will happen as we test them, with the objective of being as comprehensive as possible.

24
Rainbow Six Rogue Spear General Discussiom / Section Added To Tactical Ape
« on: February 08, 2014, 01:14:52 PM »
We have added a section covering Tom Clancy's Rainbow Six Rogue Spear on the main website and will shortly be adding more downloads for the game, in the form of missions and mods. This will happen as we test them, with the objective of being as comprehensive as possible.

25
Rainbow Six Raven Shield Modding / Mapping / Weapon Information
« on: February 08, 2014, 11:10:51 AM »
Whilst researching Rainbow Six 3 Ravenshield for the main site I came across a link that weapon modelers/modders may find interesting. It shows the weapons available in Ravenshield and pictures of their real life equivalent.

http://www.imfdb.org/wiki/Rainbow_Six_3:_Raven_Shield

26
Rainbow Six Modding / Mapping / Weapon Information
« on: February 08, 2014, 11:08:39 AM »
Whilst researching Rainbow Six for the main site I came across a link that weapon modelers/modders may find interesting. It shows the weapons available in Rainbow Six and pictures of their real life equivalent.

http://www.imfdb.org/wiki/Rainbow_Six

27
Rainbow Six Rogue Spear Modding / Mapping / Weapon Information
« on: February 08, 2014, 11:06:38 AM »
Whilst researching Rainbow Six Rogue Spear for the main site I came across a link that weapon modelers/modders may find interesting. It shows the weapons available in Rogue Spear and pictures of their real life equivalent.

http://www.imfdb.org/wiki/Rainbow_Six:_Rogue_Spear

28
Rainbow Six General Discussion / Section Added To Tactical Ape
« on: February 05, 2014, 04:24:49 AM »
We have added a section covering Tom Clancy's Rainbow Six on the main website and will shortly be adding more downloads for the game, in the form of missions and mods. This will happen as we test them, with the objective of being as comprehensive as possible.

29
SWAT 4 Modding / Mapping / Weapon Information
« on: February 04, 2014, 01:04:42 AM »
Whilst researching SWAT 4 for the main site I came across a link that weapon modelers/modders may find interesting. It shows the weapons available in SWAT 4 and pictures of their real life equivalent.

http://www.imfdb.org/wiki/S.W.A.T._4

30
SWAT 3 Modding / Mapping / Console Commands
« on: February 03, 2014, 01:50:59 PM »
Here are two of the console commands for SWAT 3 which may help in testing your mods / maps.

noshades = Night Becomes Day
swatlord  = God Mode

Whilst playing press Shift + ~  to bring up the console, then enter the command.


Pages: 1 [2] 3
anything
anything